Wednesday, January 30, 2013

Logical Fallacy - Some Examples

Going through my files, the other day, I came across a little debate I had back in 2001.  I think it is a great example of logical fallacies as often employed by "relativists". 

Below I post an op -ed published in the local newspaper on February 11, 2001.  Those were the "happy" days before 9/11; when it seemed America's biggest challenge was education.  Ah those were the days. 

I did not send my response to the newspaper, it exceeded the word count limit.  I did mail it to the "Guest Commentator.  He did not respond, but I have it on good authority he did read it to at least on of his classes. 


Saturday, January 26, 2013

End of Level Testing?????


Some thoughts on the End of Level Testing in World History:

Here is the perfect way to motivate students to study for the End of Level Bench Mark Test.  It is a simple method which reflects the end of level testing paradigm.  All students who received a score above the District average will receive the grade they have earned for the term.  However, if their score is below the district average, they get an F as their quarter grade.  When I presented this idea to my students, they were dismayed.  They protested that it wasn’t fair, that judging their entire performance on 50 questions for which they did not know how to specifically prepare was unjust.  I replied – get used to it. Of course, I would not think of actually mistreating my students in this way, but I am troubled that the District Assessment does exactly that to the school, to me, and to my students.

Here are some of my objections to the “End of Level Bench Mark Review”.

1.       I have no way of knowing or reason for trusting the scholarship or validity of the test.  In the vast content of history, from Big Bang to Renaissance, who can accurately pick what is most worth knowing.  Even more disturbing to me, how can I possibly know that the person who wrote the questions actually understands “history” in the same way I, as my students’ teacher, do.  How can I know these teachers’ choice of answers is even correct?    I find a lot of errors taught in classrooms and much of what passes for fact is actually opinion.  Let me give a few examples.  In teaching the causes of the Civil War, I have heard very well educated and studied teachers claim that slavery was not the cause of the war.  They even go on to quote Lincoln and others to support a position that the War was fought to save the Union or push some economic position. But other instructors point out that secession was motivated by the determination to preserve slavery, or that economic tension was caused by a slave based, plantation economy.  I am quite confident one could shark up documented support for the idea that the Civil War was caused by “Global Warming”.   A second example might be the conflict between Jews and Romans in the 1st century AD.  Was the conflict based on Roman greed and aggression or did the Romans act compassionately and justly to end the persecution of Greek pagans who were terrorized by fanatical Jewish sects determined to purge the “Promised Land?”  I could provide endless examples on almost every subject outlined in the prep guide provided by the District.  How can these dichotomies of cause and effect be satisfactorily sampled by multiple choice questions crafted by persons with their own bias and no idea of what other teachers are presenting to their students?  It is impossible for a classroom teacher to know what view of History will be the basis of the questions.  These will be questions crafted by high school teachers, impelled by their own personal opinion and bias, who happen to sit on the District Test Development Committee.  A student might actually choose what they have been taught as the right answer and because they are at odds with the opinion of the test builders be penalized by the predilection of the test makers..

2.       Multiple choice questions cannot honestly sample a student’s knowledge.  It is like assessing the Sistine Celling by examining paint chips.  Even more troubling is the practice of crafting distractors that are tricks.  Trick questions do not assess student knowledge of any subject.  I have never seen the test, I have no way of knowing if it is valid at even the most basic level, and yet I am expected to teach my students how to choose answers I do not know, to questions I cannot imagine. 

3.       Teaching to and reviewing for the test, is by nature instruction on the most basic level and is not a worthy use of the 90, 90 minute periods one has in class over a school year with one’s students.  Their education is compromised in order to gin up statistics which bureaucrat and college researchers can tout.  Meanwhile, the most important part of History Class is stinted.  A significant goal of a survey course in World History should be to spark a lifelong love of the study of History in a student.  As students examine the universal truths revealed in History, and become excited about seeking for them, they can develop the wisdom that is requisite for self-government.  But, time and time again, I am forced to compromise my efforts to share the truly valuable in order to prep my students for a test, the content of which I can only guess at, and which does not cover much of what I consider truly valuable for my students to learn.   In my own classes I have had to sacrifice book reports and in class enrichment activities in order to review for a 50 question multiple choice quiz that will gobble up one of their precious 90 minute classes in waiting for a computer screen to advance to the next question.

4.       The multiple test cramming process necessary to prep for tests is directly contrary to teaching strategies presented in the District Refresh training.  We are encouraged to teach to higher learning skills, emphasizing critical thinking and reasoning, but are tested on the lowest level of learning.

5.       The testing mechanism – a computer lab – has proven unreliable.  In the 2013 World History test, my students spent more time waiting for the “next” question than in giving responses.  And for several, after an hour of key clicking, the test disappeared from the desk top and no one (including the school and District STS) knew how to get it back so they could finish it. Now they, and I, will be judged on a test average skewed by a computer glitch.

6.       I have received no meaningful feedback on the test.  I have no comparative data on my student’s performance on the 2012 tests.   It has been a year, and I do not know how my students did in comparison to the district average or how I did in contrast to my fellow teachers, either at my or other high schools in the district.  How can I know weather I am doing a “good” job teaching if I have no way of comparing my efforts with any legitimate standard?  Who knows?  I may be ruining my student’s education and no one will tell me or protect them.

7.       The validity of scores on these tests is questionable.  I have heard of teachers who read the questions from the computer screens while their students are testing and then share information with the classes that test later.  There is no way to insure that scores are fairly earned from class to class and teacher to teacher. 

8.       AP Students do not (if their teacher so chooses) take the test.  This is preposterous on many levels.  First, it culls from the school and district pool the brightest students, thus giving a false assessment of our student’s capabilities.  Even more troubling to me is the excuse for not requiring testing offered in defense of AP teachers who choose not to have their students involved.  They claim that AP classes do not have time to prepare students for or to waist on testing.  If the test is valid a study tool, it should be equally beneficial to both AP and “lesser” students.  More importantly, AP Students, the self-selected best and brightest, are the ones who should have the least need of classroom time for instruction.  They should be the ones who would suffer the least harmed by having two full days of class activity and instruction ripped out of their course schedule.  

9.       Special Ed. Students and Students with Accommodations are neither accommodated nor given special consideration in the administration of the test.  Students who by definition have special needs are not given special options; rather, they are required to face testing conditions which would not be permitted to the classroom teacher.  Their scores are lumped in with those of other students without the distinct adjustments to which they are entitled. 

10.    There is enormous wasted expense in the crafting, administering, and monitoring of these tests.  District level personnel, who could better spend their time working with teachers in need of support, are devoting time and resources to this bogus process. This is a gigantic waste of money!

11.    The stated goal of the test – to improve teacher performance – is compromised.  It is claimed that there are teachers, (I was even told, mostly in Jr. High Schools), who are not teaching the desired content and that these tests will somehow motivate them to cover the appropriate material.  I am forced to ask why teachers who are, and have for decades have been, teaching core standards are forced to weaken their instruction in order to rectify the misbehavior of others.  First, I do not believe that a 50 point multiple choice test can produce the desired effect on those who are not teaching.  Second, District resources and personnel time could be better spent working directly with teachers who fail in their responsibilities.  Their detection and correction is the job of Principals and district administrators and can only be done on a one-on-one basis.  Thus, teachers who have been doing a “good” job are harmed while substandard teachers are not assisted.

There are many more difficulties with this process.  I point out that attempting to dictate a uniform Social Studies curriculum has been wisely rejected for years.  Unlike English, Science, or Math, there are not specific, multiple choice testable ideas in History.  Even more importantly, the vastness of information relating to the 7,000 year history of man, together with the practically infinite prehistory of the world, make it impossible to cover more than a tiny fraction of the subject.  There is NO reasonable way to determine which crumbs from the feast of History MUST be ingested. 

Finally, let me point out that “studies show” American education is losing ground.  Perhaps it would be a valid interpolation of the data that end of level testing has been the cause of this decline.

Friday, December 28, 2012

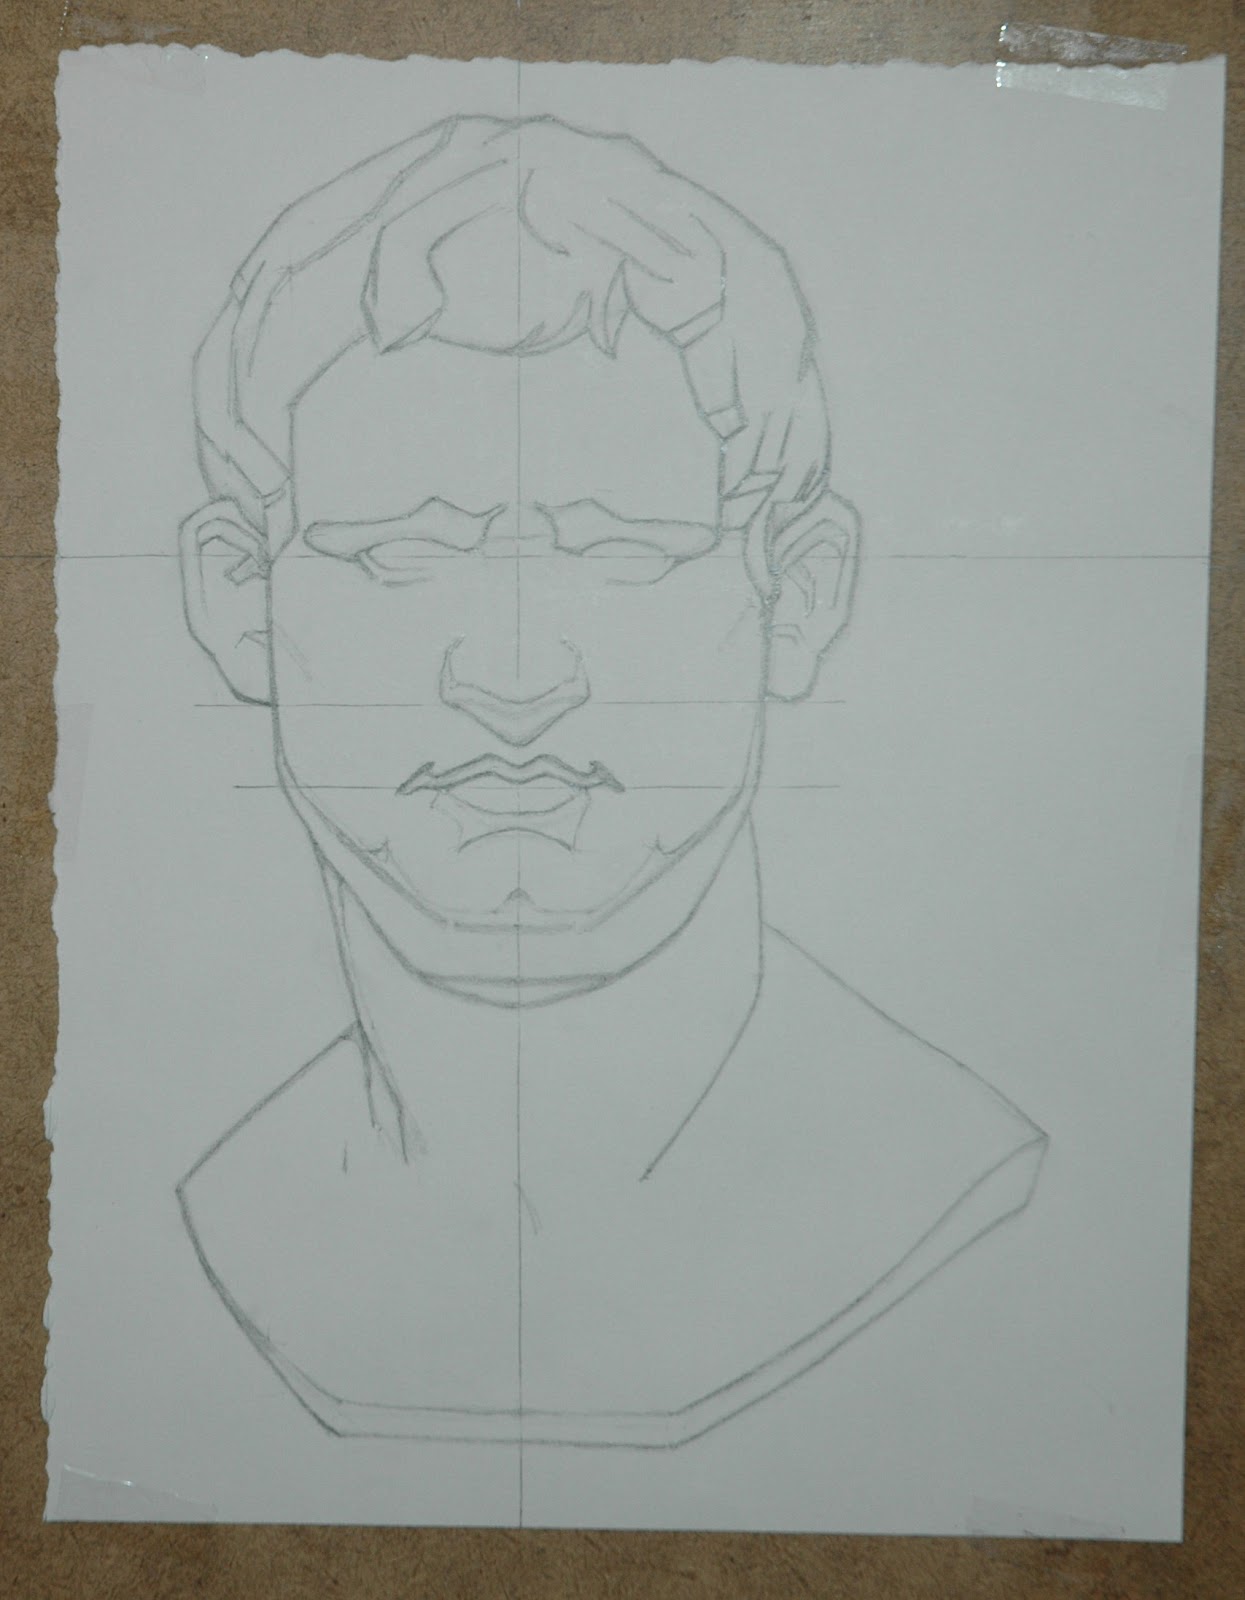
Agrippa after Gerome and Bargue

This is the Model from the Charles Bargue drawing set. 


The first step is to block in the schema.  The vertical plum line gives distance right and left, the horizontal plumb lines mark high points top to bottom.  I measure with a knitting needle.
 
Continues to scrutinize the model and check the copy.  Turn it upside down to see abstract shapes.  
 
When an accurate copy of the schema is produced, take down the Bargue sketch and replace it with the fully rendered drawing.  It is important to trace the reference lines onto the model.


 Now put in the lines that accurately contain the "dark side" of the drawing. 
 
Place the edges of the "dark" as  identical as possible.
 
Once an "exact" copy, in two tones,  has been produced, transfer the edges to the "good paper". 

Now begin to fill in the shadow shapes - once again produce a two tone, light/dark image first.

Keep pushing the edges until they match as exactly as possible.

Once the two tone drawing has been produced one begins to model the darks, reproducing cast and contained shadows.  Turning the image upside-down will make it possible to see errors.  One can work on the various edges, but don't start on values in the light side yet. The lines on the drawing are stretched strings.  That way, once the drawing is finished there will be no marks from the lines.

Carefully measure and push to perfection the forms within the shadows.  The tip of Agrippa's nose was especially fun. Once the darks are finished it is time to move on to the "lights".

Carefully measure and model the tones in the light of the figure.  This adds the three dimensionality of the form.  There is no end to the adjustments and refinements necessary to "copy" the model.

 The "finished" copy.


Tuesday, December 25, 2012

More Than I Can Bear


Last summer I made a trip with the Loll Staff to Jackson Hole.  I always try to visit all the galleries I can, and in one I saw a wonderful picture.  It was of a bear standing beside an untended fire.  There was a canoe overturned to one side and three cubs up a tree.  As I looked at the picture, I thought to myself, this is my life.

Let me explain.  All summer I worry about bears and forest fires.  The picture seemed to capture all my worries in a single frame. 

I could not get the picture out of my mind.  I made a sketch of it in my pocketbook, and then in my journal.  As the next Saturday approached, I began to wonder how much that wonderful picture was, and if I might not buy it.  Bryan was taking the crew to town so I gave him careful instructions as to where the gallery was, and what the picture looked like.  I told him to call me with the price.  Sure enough, around noon he called.  He told me that he had found the picture.  I was thinking if it was $3k or less I would buy it, somehow.  Bryan told me he had bad news.  The picture was there, as wonderful as I had said it would be, but it had been sold.  "But," he said, "I would not feel too bad - it sold for $30,000.

Janice told me it was up to me to paint the picture myself.  I determined to make my own version of the painting.  What follows is a more or less step by step progress through to the final watercolor, well final for now.

This is the first sketch in my pocketbook, when I was still dreaming of buying the original.


Here is the effort from my journal.  I have added a tent, instead of a canoe, and a food crate.  As I walk the camp, I bristle every time I see an unattended food crate.  We beg the troops to put everything in their bear box and lock it up. 
 

Once back in school, I began doodling my dream in my notebooks.
 

A cub up the tree.
 
Three cubs and some perspective and value study.
 

My first effort in watercolor.
 

I like this one better - Janice told me I had to give it to her.
 
More bear studies in my day plan book, doodled while I lectured.
I start to add mommy.
 
 
 Food box and fire, and the cubs all in place.
 

A more finished sketch of mom.


First fully developed sketch, about 8" by 11", ready to transfer to the Watercolor paper.  Note, I've added another "pet peeve", the tent is now tied to a living tree.


 Finished first draft in color.  I am experimenting with the washes as well as the composition.
 
 
Second try in color.  I've moved the the food box closer to the tent and added an ax, out of the yard!

 Here is the full sized pencil drawing, I have added a fire barrel, tipped over and empty and the garbage it disgorged.  This is also all too common, and a painful sight about camp.
 
 The back of the drawing is covered with 2B pencil, ready for the transfer to the 300 lb. watercolor paper.
 

The drawing is transferred, then the lines are retraced in 3H led to make them darker.  Note, I have added an open bear box, complete with styrofoam cooler.  I have masked those highlights I want to remain white. 
 
Then I began to add the color in washes.  First yellow then blues and greens.   The sky is flooded with blue, purple, red and orange.


 The final work.  Not worth much, but it carries the message I wanted.  I imagine it above the fireplace in the Jed Stringham Memorial Hall.  I will reference it as I go over the rules for ax, bear, and fire precautions. There is so much to worry about at Camp.  It is my life.
 
 Here is the final framing.  I have surrounded the painting in the patches issued over the last twelve years.  The last twelve Janice and I have spent there since our return from Catalina.  During that time there were also seven "Loll" shoulder patches.  The shoulder patches are, from left to right, top then bottom: 05, 06, 07, 08, 09,  2010 , 2011.  The pocket patches are posted clockwise from 01 - 12.


Monday, November 26, 2012

More Pre-Socratics


(All quotes are from Early Greek Philosophy, by Jonathan Barnes) My introductory commentary is contained in brackets [] before each quote. The quote is followed by a page # from Barnes’ book and the name of the source which Barnes sites given in parentheses (). If the quote is a paraphrase contained in the source it is referenced to as “by” and the name of the source author, if it is a direct quote of the original philosopher it is given as “from” and the authors name.

Anaximander

[Darwin foreshadowed] Further, he says that originally men were born from animals of different kind, because the other animals can soon look after themselves while men alone require a long period of nursing; that is why if they had been like this originally they would hot have survived. Pg. 20 (by Plutarch)

[On the infinite] . . . what is limited is always limited by something, so that there cannot be an [ultimate] limit if one thing must always be limited by another. Pg. 22 (by Aristotle)

[On the infinite] Hence if mass is anywhere, it is everywhere. At the same time, if empty space and place are limitless, body too must be limitless – for with eternal things there is no difference between being possible and being actual. Pg. 23 (by Aristotle)

Alcmaeon

[Man defined] Alcmaeon first determines the difference between men and animals: he says that men differ from the other animals because they alone understand, whereas the others perceive but do not understand. Pg. 38 (by Theophrastus)

Xenophanes

[Nature of truth] And the clear truth no man has seen nor will anyone know concerning the gods and about all the things of which I speak; for even if he should actually manage to say what is the case, nevertheless he himself does not know it; but belief is found over all. Pg. 41 (from Sextus Empiricus)

[Nature of truth] Let these things be believed as similar to truth, Pg. 41 (from Plutarch)

[What is relative] If god had not made yellow honey, they would say that figs are far sweeter. Pg. 41 (from Herodian)

[On learning] Not at first did the gods reveal all things to mortals, but in time, by inquiring, they make better discoveries. Pgs. 41-42 (from Stobaeus)

Heraclitus

[On War] War is father of all, king of all: some it has shown as gods, some as men; some it has made slaves, some free. Pg. 50 (from Hippolytus)

[On learning] Much learning does not teach thought. Pg. 53 (from Diogenes Laertius)

[On politics] When they [the citizens of Emphasis] asked him [Heraclitus] to write laws for them, he refused on the grounds that the city had already been mastered by a wicked constitution. He retired into the temple of Artemis and played dice with the children. When the Ephesians stood round him, he said: Why are you staring, you wretches? Isn’t it better to do this than to play politics with you?” pg. 53 (by Diogenes Laertius)

[Infinite abilities of the mind/soul] You will not find the limits of the soul although you travel all the path – so deep is its account. Pg. 54 (from Diogenes Laertius)

[On what makes us human] Thinking is common to all. Pg. 57 (from Stobaeus)

[We do not know] Most do not understand the things they meet with – not even when they have learned them do they know them; but they seem to themselves to do so. Pg. 57 (from Clement)

[On man’s universal ability to recognize Justice] They would not know the name of justice if these things did not exist. Pg. 64 (from Clement)

[On heroes slain in battle] Gods and men honor those slain in battle. Pg. 65 (from Clement)

[On finding the good] . . . those who search for gold, dig over much earth and find a little. Pg. 68 (from Clement)

Tuesday, November 13, 2012

Presocratic Philosophy


Thales of Miletus –Founder of Natural Philosophy – born 625 BC

Quoted from Lives of the Philosophers by Diogenes Laertius, as presented in Jonathan Barnes’ Early Greek Philosophy, Penguin Putnan Inc., New York, 2001, pgs.15-17,

The following aphorisms are ascribed to him [Thales].

1. Of existing things, god is the oldest – for he is ungenerated.

2. The world is the most beautiful – for it is god’s making.

3. Space is the greatest – for it includes everything.

4. Mind is the swiftest – for it runs through everything.

5. Necessity is the strongest – for it controls everything.

6. Time is the wisest – for it discovers everything.

7. He said that death is no different from life.  “Then why don’t you die?” someone asked him.  ‘Because death is no different,’ he replied.

8. When someone asked him which came first, night or day, he answered, ‘Night came first – by a day.’

9. When someone asked him whether a man can escape the notice of the gods if he does wrong, he replied: ‘Not even if he thinks of doing wrong.’ 

10. An adulterer asked him if he should swear that he had not committed adultery: he replied, ‘Perjury is no worse than adultery.’

11.  When asked what is difficult, he said, ‘To know yourself’;

12. what is easy, ‘To give advice to someone else’;

13. what most pleasant, ‘Success’;

14. what divine, ‘What has neither beginning nor end’.

15. When asked what was the strangest thing he had seen, he said: ‘An old tyrant.’

16. How can we bear misfortune most easily? – If we see our enemies fairing worse.

17. How can we live best and most justly? – If we do not ourselves do the things we blame others for doing. 

18. Who is happy? – One who has a healthy body, a well-stocked soul and a cultivated nature. 

19. He says that we should remember our friends both present and absent,

20. and that we should not beautify our appearance but be beautiful in our practices.

21. ‘Do not be rich by evil means,’ he says,

22. ‘and let not words set you against those who have had your trust.’

23. ‘Expect from your children the same provision you made for your parents.’

23. [His motto] – Know thyself!


Thursday, November 01, 2012

We Get to Choose


America and the world are at a cross road.  Americans are uniquely blessed and bear the heavy responsibility to choose a course for our people’s future struggle.

I do not believe four more years of President Obama will destroy America or end the world but he has taken the country in the wrong direction and four more years will only make our journey to success more difficult.

Our economy is worse than it was four years ago.  Our debt, aggravated by reckless spending, has greatly increased under Mr. Obama, and his plan is projected to double it.

More Americans are out of work than at any time since the Carter Catastrophe.  Family income is down and more Americans than ever are on food stamps.

Business is under siege, beset by over-regulation and government meddling.

Our national resources are locked up, our trade deficit soaring, and gigantic new entitlements are bankrupting our country and evaporating opportunities of generations yet unborn.

Just as great a danger is the loss of American’s standing in foreign affairs.  Our country is now seen as weak by our enemies and unreliable by our friends.

We are held hostage by Chinese money, Venezuelan Oil, Islamic terror, Iranian atomics, and Russian Ambition.

A Romney Administration is the best hope to right this slide to disaster.  Self-determination, freedom, free-enterprise, and reduced government power will increase individual opportunity and will solve the economic ills.  Mr. Romney will allow America to utilize its resources, stop wasteful spending, lower taxes for all, and strengthen business and personal prosperity and incentive.

Internationally, America can again take the lead economically, technologically, and stand again as the hope of freedom and peace.

It comes down to this.  Mr. Obama is a weak leader who has led us poorly.  Mr. Romney is a proven strong leader who will guide our American journey to a better future.

Tuesday, September 11, 2012

Orwellian


I have been back in “Civilization” for three weeks. It is as if I have arrived in George Orwell’s 1984. Last week, I listened with disbelief to the Democratic National Convention – Doublethink everywhere. There was John Kerry, who called American Marines risking their lives to liberate Iraq from a mass murder, baby killers, talking about respecting our military. Joe Biden claiming the GM is alive even as they announce they are selling cars at $49,000 loss, when they will never repay the “lone” they have stolen from the taxpayers, and have paid no taxes at all. There was Bill Clinton, a liar from the beginning, claiming that things are better in an America where unemployment has reached levels not approached since the mess created by the Carter administration and were the average pay of our citizens has shrunk $4,000 a year.

Obama’s speech is not worth mentioning.

Orwell’s protagonist, Winston Smith, finds himself in a filthy slop house trying to eat tasteless pinkish – gray stew. He tries to remember the world that once was, the world before the Party and Big Brother made it “better”. He listens as the telescreen proclaims how much improved things are than they were and Winston knows it is a lie.

“As though in confirmation of this, a trumpet call floated from the telescreen just above their heads. However, it was not the proclamation of a military victory [Osama is Dead] this time, but merely an announcement from the ministry of Plenty.”

“’Comrades!’ cried an eager youthful voice. [Bill Clinton, no doubt] ‘Attention, comrades! We have glorious news for you. We have won the battle for production! Returns now completed of the output of all classes of consumption goods show that the standard of living has risen by no less than twenty per cent over the past year. All over Occania [The convention hall and MSNBC] this morning there were irrepressible spontaneous demonstrations when workers marched out of factories and offices and paraded through the streets with banners voicing their gratitude to Big Brother [Barack Obama] for the new, happy life which his wise leadership has bestowed upon us.”

As he sits there contemplating the lies he himself has stuffed into the media relating to consumption goods the voice broadcasts his own fabrications. “It appeared that there had even been demonstrations to thank Big Brother for raising the chocolate ration to twenty grams a week. And only yesterday, he reflected, it had been announced that the ration was to be reduced to twenty grams a week. Was it possible that they could swallow that, after only twenty – four hours? Yes, they swallowed it. Parsons swallowed it easily, with the stupidity of an animal.

The eyeless creature at the other table swallowed it fanatically, passionately, with the furious desire to track down, denounce, and vaporize anyone who should suggest that last week the ration had been thirty grams. Syme, too – in some more complex way, involving doublethink – Syme swallowed it. Was he, then, alone in the possession of a memory?”

Back from Camp, back in the Obama Nation; I am forced to ask, am I the only one with a memory. Am I the only one who has ever read Orwell? Am I the only one who knows it is all a lie?


Thursday, December 22, 2011

Copying a Charles Bargue Lithograph

Charles Bargue was a French artist and lithographer who created a series of “models” for training according to the academic style of art education. I have admired his work
for years, bought a copy of the Charles Bargue Drawing Course by Gerald M. Ackerman, and have fussed around in some effort to learn from it; I was not overly successful. However, this past fall, I determined to make an attempt to actually follow Bargue’s system.

A visit to the internet revealed several examples of artists actually doing the Bargue drawings, and I also found a video tape, The Bargue Drawing Companion, offered by the Academy of Realist Art in Toronto. Although rather pricey, I bought it. Fernando Freitas gives the lecture. I have watched it several times, gathered the tools he recommends (along with some others suggested elsewhere in my studies), and set up a modified training program.

I have also made extensive notes of the excellent material covered by Mr. Freitas, and have determined to study those notes every day as well. I am now launched on, at least, a two-year
study of the Charles Bargue drawing course.

Here is a drawing produced according to Freitas recommendations, applied to a Bargue plate from the Charles Bargue Drawing Course by Gerald M. Ackerman. This post is mostly for my own study, although I hope is will be of some interest to those who enjoy the study of art, and that it might also serve as an example of how determined effort can produce some level of success in all aspects of life.

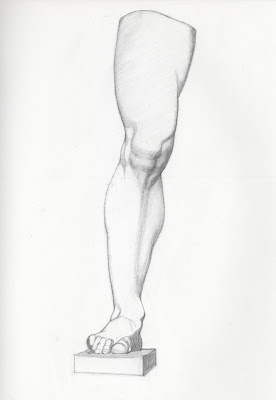
Plate I, 27. Leg of Germanicus, front view:

Copying the Schema

I divided the plate into the schema and the finished model, enlarging them via my photo shop program to fill an 8 ½ X 11 inch sheet of paper, and started the process.

Tape down the image in a vertical placement; use a T square or measure equal distance from ends of the board to establish a vertical line, and then line up the paper on this “plumb line”.

Construction – block in the Bargue schema, the construction outline. Make sure the outline contains sound structures of the object to be blocked in. Start with large proportions, widths and heights indicated by points.

Frame the vertical plumb line to get distance to right and left and use the horizontal plumb lines to mark high points top to bottom.

Mark “high points” with a tiny cross (+) with the high point established at the center. Measure how tall and how wide; strive for perfection – to see as accurately as possible.

Once the schematic of the horizontal and vertical is set up – actually measure the “widths” of the parts of the drawing. Example: 1) full width – many times in many places, 2) full height – in many places, many times.

Use the needle as a moving plumb line, line up the needle on various highpoints and follow down the drawing to see if it matches the “model”. Keep parallel to vertical plumb line on the model and the drawing. Measure the high points on the schema and check them on the drawing. Check
the horizontal relationship as well.

Once the dots are connected, closely examine the Bargue schema and carefully copy it.

This will produce a copy of Bargue’s “schema”.


Articulation – separation of light and dark: Place finished (fully rendered) Bargue lithograph
in the exact placement – make vertical and horizontal plumb lines on the backing. To do this overlay to trace center and horizontal plumb lines onto the copy of the fully rendered Bargue lithograph.

Measuring contours: Layer info on top – erase underneath. Find edges of shadow. Also – outline
overlapping forms. Map out details of contour and of shadow edges.

Massing in: Divide light and dark with line, then color in up to the edges. Make it uniform – highest contrast of light and dark, (light and dark families). Use soft pencil to fill in shadow shapes – to discover character of shape – as accurately as possible. Go up to the edge of uniform value.

As one Masses in shapes try to see them as some “abstract” or literal shape – such as a dogs head or a snarling wolf, an egg, bull’s horns, or a bear. Check one shape at a time – both positive and negative shapes. Use a mental image of a clock to gage positions. One should flip one’s eyes back and forth to check for differences. Make adjustments with either the pencil or the eraser. Tap the eraser gently to lift off dark marks.

At this point, A two tone drawing has been produced, the white o the paper and a single, flat, standard tone to represent the dark.

Freitas recommends tracing a copy of the “cheep white paper” drawing onto a sheet of Stonehenge paper for producing the final drawing. For the drawing I am showing here, I do not do this. Rather, I go on to follow his “modeling” and “rendering” instructions
directly on top of the “silhouette” shown above.

For this drawing, I have continued to work on the “cheep white” paper. At present my study
entails doing the selected Bargue copies in a wire bound Strathmore sketch pad. So I applied the finish work directly to the “silhouette” which Freitas calls the “carton”.
A. Massing in the Shadows. (*These steps were already done in the production of the “cartoon”.)

1. Start by shading around the contours of the shadow shapes. Make sure the pencil is sharp! Use a 2B.

2. Proceed to shade in the interior of the shadow pattern.

3. In the first “lay in”, make the tone as uniform as possible.

* The tonal value should be the predominant value that permeates the shadow. (1 – 9)

4. The second pass at “laying in” continues to perfect the overall uniformity of the value by filling in gaps in the tone.

* Remember, you are only after the one dominate value, do not attempt light or dark tones in the shadow during this stage.

5. In your third, final pass at filling in the shadow, move over to a harder pencil to fill in even tighter, making the tone even and the shape flat.

6. Use the soft kneaded eraser to lift any dark specks from the shape.

a. The pressure that is applied to the eraser can bemodified to lift either more or less graphite.
b.The eraser is a very flexible drawing tool. It can be shaped as a wedge to shape and
clean edges.

* To insure one can erase all marks cleanly, DO NOT press hard in the making of outlines.

7. Light pressure is applied to the pencil as it fills voids in the tone.

8. Establish unique abstract, light and dark shapes. Flip eyes back and forth to see differences
in these “abstract” shapes.

B. Modeling the Darks

Once shapes are in place and the dominate value has been applied, begin to work values inside the shadows to model the darks = rendering the darks.

What is inside the shadows?

Reflected light

Darkening along the edge of the shadow.

Contained shadow.

Cast shadow.

Edges – between tonal values

Hard
Soft
Blended
Lost

These have shapes produced by tones and the blending between tones.

D. Rendering the Shadows

1. Using a 2B, begin to establish the darker values in the shadow.

a. Begin to establish the harder edges on the shape.
b. Using the kneaded eraser, clean the edges.
c. Blend the darkness into the interior shadow.
d. Soften the bed bug line and establish a slightly darker value.
e. As you are establishing the range of values, continue to perfect the shape.
f. Using a sharp tip on the kneaded eraser, gently tap out tone to establish the lighter values in the shadow.
g. Keep pushing and pulling the value until they sit correctly.

2. Cast Shadows within a shadow:

a. Using a 2B, begin to establish the darker values in the shadow.
b. Begin to establish the harder edges on the shape.
(1). By establishing the darkest dark, we are separating the
cast shadow from the contained shadow.
(2). Soften the bed bug line and establish a slightly darker value.

The Light - Rendering the Lights

Half tones help create the illusion of the three dimensionality of the form. They allow the artist to wrap the form. They follow the surface of the form and help us know how much it turns, (how full, round, or blocky) the form is. The geometric forms – cube, cone, cylinder, and sphere – are all found on the surface of the face and figure.

The longer the
transition the shallower the form; the quicker the change in value the quicker the form will turn. Start at the inside of the value and grow out to shape it. Mainly use HB and 2H pencils for lighter tonal values. The darker pencil will overstate the tonal value. Also, work with the eraser.

Modeling the Lights

See the forms to be modeled. Search the entire form and isolate the shapes of shading.

1. Begin to shape the form. Be aware of the spaces of light between the sections of any shadow.

2. Establish darker half tones to suggest the form.

3. Using the pencil’s point, soften the values into each other.

4. Be aware of how the values of the form turn from darks to lights.

Rendering the Lights

1. Values to be considered on the “light side” are lighter, mid tone, and darker half tones.

2. Look at areas of value: how dark, how light, how the edges blend. *Note – the lightest area
is often just under the shadow area or somewhere to the center of a sphere.
3. Consider the direction of light: Value moves from light to dark, or from dark to light; turning the form equals the turning of the light. Half tones change in relation to the change of direction in the form.

A. Modeling the Lights

See the forms to be modeled. Search the entire form and isolate the shapes of shading.

1. Begin to shape the form. Be aware of the spaces of light between the sections of any shadow.

2. Establish darker half tones to suggest the form.

3. Using the pencil’s point, soften the values into each other.

4. Be aware of how the values of the form turn from darks to lights.

B. Rendering the Lights

1. Values to be considered on the “light side” are lighter, mid tone, and darker half tones.

2. Look at areas of value: how dark, how light, how the edges blend. *Note – the lightest area
is often just under the shadow area or somewhere to the center of a sphere.

3. Consider the direction of light: Value moves from light to dark, or from dark to light; turning the form equals the turning of the light. Half tones change in relation to the change of direction in the form.

Finishing the Drawing

After dealing with all of the dark “family” and all of the “light” family, going around piecemeal and dealing with all values in both families, one has produced an illusion of a three dimensional form. It has a sculptural appearance and looks finished.

However, having dealt piece meal one has lost sight of the “big picture”. So step back and review
all areas and see if there has been a loss of contrast. In other words, are some values too close
together or too soft? Consider punching the darkest darks; examine the hard edges. Is there a need to lighten the highlights with the eraser?

This tweaking will give the drawing punch and oomph!

First comes “line work”. Look at how thick or thin the lines on the model (the Bargue lithographs) are and make sure they are faithfully reproduced on the drawing. Examine the edges of the contours of the main form and of all inner forms.

Check value relationships between lines; some will be light, some mid-tone, some very dark.

Second, accenting and highlighting. Carve hard dark lines with the 2B pencil. Also, form a “chiseled eraser” and clean any fussiness or softness next to the darkest darks and the lines that form their edges next to the “paper”, which is the lightest value. *Don’t change the shape of the drawing. Razored edges will pop forms off the background.

Go all around the contours and check the lines for thickness, value, and length. Some will be thin, some thick, some short, some medium, some long.

This produces the finished drawing.
.
.
.
The Bargue Drawing Companion
Notes on the lectures by Fernando Freitas of the Academy of Realist Art,
Toronto.


The Purpose of this Drawing Course:
Learning How to See


Notes by Delose Conner

The Process –Step by Step

1. Progress form simple to more elaborate Bargue drawings.

2. One needs tools, ability, and skill.

3. Tape down the image in a vertical placement.

4. Use a T square or measure equal distance from ends of the board to establish a vertical line, and then line up the paper on this “plumb line”.

5. Horizontal plumb lines – show anatomical horizontal relationships.

6. Reproduce a “first” copy on “cheep” white paper.

7. Use the knitting needle to extend the horizontal plumb.

8. Work from the center.

9. Start with the 2B – the darkest and safest pencil.

10. Hold the back of pencil to prevent making hard, dark, and hard to remove, ridge cutting marks.

11. Do not scratch along with little marks – Commit – sweep gently back and forth. Make a ghostly mark – very light, although visible to the eye. Hard, dark lines will come later.

*Don’t scratch, don’t press down!

12. Do everything in smooth, human circular motions. Use the pencil as an extension of the wrist, elbow, or shoulder; depending on the size of the arc desired.

13. Straight lines must be drawn in small forced line segments.

Measuring the drawing:

14. Construction – block in the Bargue schema, the construction outline. Make sure the
outline contains sound structures of the object to be blocked in. Start with large proportions, widths and heights indicated by points.

15. Frame the vertical plumb line to get distance to right and left and use the horizontal plumb lines to mark high points top to bottom.

16. Measure the high points.

17. Use the tip of the needle and the thumb and fingernails. Hand positions: Horizontal – thumb on plumb line – tip to end. Vertical – two hand motion, moving the needle up and down.

*The measurements do not need to be 100% perfect – do not use a ruler. A little bit of error
allows one to use the eye to correct the drawing.

18. One must learn to train observation skills by measuring how well one can see (check the work). Measurement and correction strengthens one’s observation of nature. Aim to train an accurate eye that can read value, color, shape, and gesture.

19. Like a weight lifter – slowly build “power” by repetition. After building strength for
a year or two, one can wean off the measurement with the knitting needle.

20. Mark “high points” with a tiny cross (+) with the high point established at the center. Measure how tall and how wide; strive for perfection – to see as accurately as possible.

21. Once the schematic of the horizontal and vertical is set up – actually measure the “widths” of the parts of the drawing. Example: 1) full width – many times in many places. 2) full height – in many places, many times. 3) many pieces, for example, the height of the nose, hair, ear, ect.
(the inner forms of the object).

22. Use the needle as a moving plumb line, line up the needle on various highpoints and follow down the drawing to see if it matches the “model”. Keep parallel to the vertical plumb line on the model and the drawing. Measure the high points on the schema and check them on the drawing.

23. Check the horizontal relationship in the way described for the vertical in 22.

24. Turn the images upside down – this fresh appearance of an abstraction will allow one to see flat shapes. Flip eyes back and forth between the Bargue etching and the drawing.

25. Simple Geometric Shapes:

a) Look at isolated shapes – this uses one’s natural ability and strengthens one’s observation skills. Use the needle to examine – don’t erase errors at once.
b) Mistakes are our friends – they teach us.

26. Articulation – separation of light and dark:

a) Place finished (fully rendered) Bargue lithograph in the exact placement – make
vertical and horizontal plumb lines on the backing.
b) Overlay to trace center and horizontal plumb lines onto the copy of the fully rendered Bargue lithograph.

27. Measuring contours:
a) Layer info on top – erase underneath.
b) Find edges of shadow.
c) Also – outline overlapping forms.
d) Map out details of contour and of shadow edges.

*Check by scrutinizing for accuracy.

28. Massing in:

a) Divide light and dark with line, then color in up to the edges.
b) Make it uniform – highest contrast of light and dark, (light and dark families)
c) Use soft pencil to fill in shadow shapes – to discover character of shape – as accurately as possible.
d) Go up to the edge of uniform value.

*In nature there is no such thing as line – only the edges of shapes; this includes those of light and dark shapes.

** Be as neat and uniform as possible.

29. Mass in the shapes as some “abstract” or literal shape – such as a dogs head or a snarling wolf, an egg, bull’s horns, or a bear.

a) Check one shape at a time – both positive and negative shapes.
b) Use a mental image of a clock to gage positions.
c) One should flip one’s eyes back and forth to check for differences.
d) Make adjustments with either the pencil or the eraser. Tap the eraser gently to lift off dark marks.

AT THIS POINT, A TWO TONE DRAWING HAS BEEN PRODUCED, THE
WHITE OF THE PAPER AND A SINGLE, FLAT, STANDARD TONE TO REPRESENT THE DARK.

30. Transferring the drawing to the “good” paper:

a) Cover the image’s back with 2B graphite. Put on a lot.
b) Place the “smooth” or less toothed side of the Stonehenge
paper facing up.
c) Secure the “cartoon” just at the top so it can be lifted to check if the marks are transferring.
d) Use the HB, the harder pencil, to retrace the outline. Don’t push too hard or it will bruise the paper, but one should push hard enough to leave a mark – be sure to be accurate.
e) Lift the pencil at each change of direction – at each high point – so as not to weaken the drawing.

Rules of Light Logic

I. Lorenzo de Medici’s academy:

A. Drawing cubes, cylinders, and spheres illuminated by a single candle.

B. Chiaroscuro – pictorial representation in terms of light and shade without
regard to color . . . the interplay of light and shadow on or “as if on” a surface.

II. Nature uses light to reveal the geometry of objects in two ways:

1. By the way light falls over the form and changes the amount of light and darkness (know as value) on the different parts of the object.

2. By the hardness and/or softness of the edges of the shadow.

*One can accurately represent these changes by properly using the Rules of Light Logic.

III. The Nine Point Value Scale: Segmenting the scale into nine increments from 100% light at a 1 to 100% dark at a 9.

IV. Light Logic – The examination of the effects of light on a three-dimensional form.

A. The simple/basic forms are spheres, cubes, and cylinders.

B. The artiest reduces all natural forms into these components or parts of them.


V. Two common lighting effects exist in nature:

A. Crest lit – the lighting configuration when the lightest light is found somewhere
within the form. *The light, medium, and dark halftones turn away from the lightest highlight in all directions.

B. Rim-lit is the lighting configuration when the lightest light is found on one side of
the form. *The light, medium, and dark half-tones, from the lightest in one direction, move away from the light, turning into the dark.

VI. Direct light produces the following nine value scale:

1. Bright spot (highlight) – where the light is perpendicular to the surface of the form.
2. Crest or rim light – around the “rim’ of the highlight.
3. Light halftone – local value = normal value of the object.
4. Light medium halftone
5. Medium halftone
6. Dark halftone
7. Reflected light – light reflected from a surface onto the form.
8. Bedbug line – the edge where light and dark sides meet. Where the light
falls off the form = core shadow.
9. Cast shadow – a shadow cast on a surface by a form.


VII. The Silhouette – The division of light and dark (shadow).

The massing in of the dark (shadow/negative) giving the artist a light (positive) is fundamentally the most important statement in representational drawing and painting.

A. The artist achieves a likeness of their subject in a flat statement. This = the “graphic” appearance.

B. The bedbug line (shadow edge, core shadow, or terminator line) is the edge that tells the
artiest when the direct light has fallen off the form.

C. The bedbug line weaves over every surface-change on an object. *The purpose of the bedbug line is to describe the form.

VIII. Contained Shadow:

*Note there are two types of shadow; the form shadow (contained shadow) and the cast shadow.

A. Contained Shadow is the shadow pattern found within the form.

B. The cast shadow is a shadow thrown by the form.

C. All shadows read darkest at their edges.

D. Contained and cast shadows can be broken down into: lighter darks, medium darks, and darkest darks.

1. Lightest darks – value found in the contained shadow and called reflected light.

a. *Reflected light is light that travels past the form and is reflected into the shadow.
b. * How light or dark reflected light is depends on how far the reflected light has traveled: greater = darker / shorter = lighter.

2. The value of the bedbug line will register lighter or darker depending on how “fast” or “slow” the direct light falls off the form.

a. Faster / darker = harder edge of value shape.
b. Slower / lighter = softer edge to the value shape.
Note:

* The squarer or sharper the form the darker and harder the edge.
** The rounder or more blunt, the softer and lighter the edge.
3. The darkness and hardness of the edge is dictated by the planes or facets of the form, and the direction of the light.

IX. Cast Shadow (Thrown Shadow) – Does not have a even value throughout.

A. Harder and darker as the shadows approach the form.

B. Softer and lighter as the shadows move away from the form.

C. The interior of the cast shadow is illuminated by indirect light.

D. Again, the values within the cast shadow will darken closest to the form – getting
lighter away from the form.

E. The Penumbra = partially shaded outer region of cast shadow. It’s length gets longer or shorter as it moves toward or away from the form.

X. The Light = The area of the form illuminated by direct light.

*In “the light” one finds: highest-lights, medium-lights, and dark-lights.

A. Highest light = Highlight

B. Medium-lights and dark-lights are determined by the surface of the form falling
away from the direct light.

1. Change of direction of the facets or planes of the surface causes a change in value.

2. The hardness or softness of the edges of values is determined by how fast the form falls away from the light.

a. The squarer or sharper the planes, the harder the edges.
b. The softer or rounder the planes, the softer the edges.
c. Planes facing the direct light are lighter.
d. Planes turned away from the direct light are darker.
e. Darker half-tones are commonly found closest to the bedbug line.

* Note: In essence, the artist must feel with their eyes how light caresses the
form. This feeling is duplicated in the rendering of the forms.

XI. Rules:

1. The light and dark must be separated – the silhouette (the likeness).

2. The bedbug line must describe the form.

3. The darkest light must be lighter than the lightest dark and the lightest dark must be darker than the darkest light.

4. All shadows must be darker at the edges.

5. Shadow edges on the form must be hard or soft depending on how fast the form curves from
the light. Values along the edge must change – darker if harder edged and lighter if softer edged.

6. Half-tones must wrap or vale the form.

* Bedbug line: “A bedbug walking across the surface of a sphere, steps boldly from the light to the shadow. That’s it.” R. H. Ives Gammell

** “Our tiny bug is either in the light, or he is in the shadow . . . The two worlds are totally
separate and no value occurs in both.” Stapleton Kearns


Materials List
Graphite Pencils: 2B, HB, 2H

Erasers: kneaded and white

Paper: tracing paper, drawing paper, and Stonehenge
paper (light gray or pearl gray)

Drawing Board: 18 X 24 inch plywood or Masonite.

Drawing Tools: utility knife, sand paper block, masking
tape, pencil extenders, 2.25 MM knitting needle, eraser shield, and mall stick
or protection sheet.

The Drawing Process

I. The Dark Side - Massing in the Silhouette

A. Massing in the Shadows.

1. Start by shading around the contours of the shadow shapes. Make sure the pencil is sharp! Use a 2B.

2. Proceed to shade in the interior of the shadow pattern.

3. In the first “lay in”, make the tone as uniform as possible.

* The tonal value should be the predominant value that permeates the shadow. (1 – 9)

4. The second pass at “laying in” continues to perfect the overall uniformity of the value by filling in gaps in the tone.

* Remember, you are only after the one dominate value, do not attempt light or dark tones in the shadow during this stage.

5. In your third, final pass at filling in the shadow, move over to a harder pencil to fill in even tighter, making the tone even and the shape flat.

6. Use the soft kneaded eraser to lift any dark specks from the shape.

a. The pressure that is applied to the eraser can be
modified to lift either more or less graphite.
b. The eraser is a very flexible drawing tool. It can be shaped as a wedge to shape and
clean edges.

* To insure one can erase all marks cleanly, DO NOT press hard in the making of outlines.

7. Light pressure is applied to the pencil as it fills voids in the tone.

8. Establish unique abstract, light and dark shapes. Flip eyes back and forth to see differences
in these “abstract” shapes.

B. Modeling the Darks

Once shapes are in place and the dominate value has been applied, begin to work values inside the shadows to model the darks = rendering the darks.

What is inside the shadows?

Reflected light

Darkening along the edge of the shadow.

Contained shadow.

Cast shadow.

Edges – between tonal values

Hard
Soft
Blended
Lost


These have shapes produced by tones and the blending between tones.

C. Edges

1. Hard edges do not require softening. They remain sharp.

2. Soft edge:

a. Using a tapered eraser point, break up the hardness of the edge by gently taping.
b. Using the point of the pencil, feather the tip across the edge, lifting the point as it enters the lighter area. *This will darken the value along the bed bug line and soften the edge of the shadow simultaneously.
c. Using the point of the pencil gently soften (blend) the bed bug line into the lighter shadow area.
d. Using the hardest pencil, the 2H, soften the transition between the shadow and the light.

3. Blended Edge:

a. Using the tapered point of a kneaded eraser, break up the hardness of the edge, travelling further into the dark tone.
b. Using the HB pencil, travel across the transition, using light long strokes to defuse the edge.
c. Using the HB pencil, use small circular strokes to fill in voids at the appropriate value. *The
circular filling will neaten the transition.
d. Using the 2H, blend the subtle shading.

4. Lost Edge:

a. Using the tapered point of the eraser, break up the hardness of the edge and move even further back into the tone. *The tip of the tapered eraser can be stroked as a pencil to subtly lighten the tone over a broader area.
b. With the HB, use the tip of the pencil to build the tone on the lighter side.
c. Using the tip of the pencil, fill in voids in the darker areas.

D. Rendering the Shadows

1. Using a 2B, begin to establish the darker values in the shadow.

a. Begin to establish the harder edges on the shape.
b. Using the kneaded eraser, clean the edges.
c. Blend the darkness into the interior shadow.
d. Soften the bed bug line and establish a slightly darker value.
e. As you are establishing the range of values, continue to perfect the shape.
f. Using a sharp tip on the kneaded eraser, gently tap out tone to establish the lighter values in the shadow.
g. Keep pushing and pulling the value until they sit correctly.

2. Cast Shadows within a shadow:

a. Using a 2B, begin to establish the darker values in the shadow.
b. Begin to establish the harder edges on the shape.
(1). By establishing the darkest dark, we are separating the cast shadow from the contained shadow.
(2). Soften the bed bug line and establish a slightly darker value.

E. Summery – Massing in the silhouette – rendering the shadows, reviewing the shadow pattern.

Examine the completed rendering – observe light, dark, and medium shadow range – work with 6 – 7 – 8 – 9.

Use 2B and HB pencils to achieve the values in the darker range.

*Note – As a beginner – do only darks first, then the lights. Later one may choose to work on dark and light at the same time.

1. Copy the plate from the Bargue book as exactly as possible.

*To familiarize: Observe the contained shadow, the shadow that actually exists on the form and cast shadows that move off the form to the background. These two fuse together to form one large shadow pattern.

* Cast shadows get harder and darker as they get closer to the source. They get softer and lighter
as they pull away from the source.

* In the contained shadow, there is a lighter (whiter) reflected light close to the supporting form.

* Bed bug line is away from the light of the form – softened depending on how quickly the form is turning.

2. Rendering: Blending shadows so one cannot tell where one value ends and another begins.

Hints:

1. Keep the pencil as sharp as possible.

2. Keep looking at the model – to copy exactly the value shapes – copy the character of the edges.

3. Keep working with the eraser.

4. Work as uniformly and as neatly as possible.

5. Repetition is the way to master these skills sets.

6. It is OK to be continually improving – repetition improves technique.

II. The Light - Rendering the Lights

1. Half tones help create the illusion of the three dimensionality of the form. They allow the artist to wrap the form. They follow the surface of the form and help us know how much it turns, (how full, round, or blocky) the form is. The geometric forms – cube, cone, cylinder, and sphere – are all found on the surface of the face and figure.

2. The longer the transition the shallower the form; the quicker the change in value the quicker
the form will turn.

Notes:

*The most important thing is the illusion of three dimensionality.

** When placing the tonal values in the “light” never outline.

*** Half tones don’t have an outline – they have an edge, some are softer than others.

3. Start at the inside of the value and grow out to shape it.

4. Mainly use HB and 2H pencils for lighter tonal values. The darker pencil will overstate the tonal value.

5. Also, work with the eraser.

A. Modeling the Lights

See the forms to be modeled. Search the entire form and isolate the shapes of shading.

1. Begin to shape the form. Be aware of the spaces of light between the sections of any shadow.

2. Establish darker half tones to suggest the form.

3. Using the pencil’s point, soften the values into each other.

4. Be aware of how the values of the form turn from darks to lights.

B. Rendering the Lights

1. Values to be considered on the “light side” are lighter, mid tone, and darker half tones.

2. Look at areas of value: how dark, how light, how the edges blend. *Note – the lightest area
is often just under the shadow area or somewhere to the center of a sphere.
3. Consider the direction of light: Value moves from light to dark, or from dark to light; turning the form equals the turning of the light. Half tones change in relation to the change of direction in the form.

Notes:

* Directions on the picture plane follow those on a map: north, south, east, west.

** Edges of half tones can be soft and defused – even lost.

*** Lightest tone = the paper.

**** As the form turns away, it gets darker.

C. Summery:

1. Observe all half tones in the light side.

2. Never outline.

3. Start rendering the forms from their center.

4. Use HB and 2H pencils.

Accenting and Highlighting – Finishing the Drawing

I. The general review and accenting of the drawing.

After dealing with all of the dark “family” and all of the “light” family, going around piecemeal and dealing with all values in both families, one has produced an illusion of a three dimensional form. It has a sculptural appearance and looks finished.

However, having dealt piece meal one has lost sight of the “big picture”. So step back and review
all areas and see if there has been a loss of contrast. In other words, are some values too close
together or too soft? Consider punching the darkest darks; examine the hard edges.
Is there a need to lighten the highlights with the eraser?

This tweaking will give the drawing punch and oomph!

II. Line work

Look at how thick or thin the lines on the model (the Bargue lithographs) are and make sure they are faithfully reproduced on the drawing. Examine the edges of the contours of the main form and of all inner forms.

Check value relationships between lines; some will be light, some mid-tone, some very dark.

III. Accenting and Highlighting

Carve hard dark lines with the 2B pencil.

Form a “chiseled eraser” and clean any fussiness or softness next to the darkest darks and the lines that form their edges next to the “paper”, which is the lightest value.

*Don’t change the shape of the drawing.

Razored edges will pop forms off the background.

Go all around the contours and check the lines for thickness, value, and length. Some will
be thin, some thick, some short, some medium, some long.

Summary

What is one trying to learn?

1. Learn to see. Drawing is seeing”!

a) Try to master simple geometric shapes; seeing them and drawing them.
b) Learn to see flat shapes. *master this
c) The eye must become more accurate.
d) Look for the iconic shapes of the light or dark patterns.

Ask – what do these shapes look like? How accurate are their size, proportion, and location? Check the accuracy of the different angles that appear in the shape. (angles – short, long, medium, more vertical or more horizontal)

e) Learn to see the light and dark side – keep the two families separate. Learn values
and value relationships, nine values – from white paper to pure black.

2. Learn to read the values. On the dark side: a) lightest b) medium c) darkest dark.

a) Edges are darker than the interior.
b) Cast shadows move from harder, darker edges closest to the source and move away to lighter or softer shadows.
c) Shadow edge is the bedbug line. Softness of the edge depends on how round or square the form is at the bedbug line. The rounder the form is the softer and lighter
the value of the edge is. Square edges are harder and darker.

3. Learn to look into the value of the lights: lightest light, med-tone light, and darkest light.

*Remember – The lightest dark cannot be lighter than the darkest light, the darkest light cannot be darker than the lightest dark.

4. Lean to see and reproduce the EDGES: hard, soft, blended, or lost.

5. The goal is a representational three-dimensional drawing.

6. Copy the Bargue etchings over and over again to reach a high standard in all skill sets.